8080 KHz
10865
16410
20015
This program will allow you to receive (in conjunction
with a shortwave receiver) FAX transmissions. There are many sources of
FAX that can be received, from radio amateurs to news services to weather.
The most prevalent and strongest transmissions are
weather charts by the U.S. Navy.
To use the program, you must own a 512k Coco 3 and
a shortwave receiver capable of SSB (single side band) or CW morse code)reception.
The unit must be very stable both in frequency and BFO generation. Older
units that drift will work but may yield distorted images even when constantly
adjusted.
Connect the radio to your Coco using
the cassette cable. The black input plug should be connected to the
headphone or audio out of the radio. Tune the radio to a FAX transmission
in the USB (upper side band) mode. This can be done best from within the
program with the SOUND option active. This option should also be used to
ensure that the Coco has not been overloaded. Adjust the radio volume for
clear tones. Distortion indicates the radio volume should be decreased.
SOUND
1) Select the sound option from the command level.
2) Joystick will be disabled while sound is active.
3) Use button #1 to disable sound and reactivate joystick.
Adjust the BFO so that the program's tuning indicator
stays inside the end markers. If the tone is too far outside the markers
the indicator will not be active. Between transmissions, a steady
pure tone should be heard. On USB this corresponds to the high marker;
on LSB to the low marker. FAX usually is received USB but if this
yields charts that are mostly black (color inversion) or if there is
excessive interference, try LSB for the problem frequency.
Once a station is tuned in, select the reception
rate; 120 LPM typical. Program timing is critical for proper reception.
If the image drifts slowly across the screen during reception, it may be
necessary to adjust the fine tuning constants indicated in the Basic program.
Do not make large changes; +-1 or 2 is usually enough.
IMPORTANT: The key to good image reception
is a good outdoor antenna. A whip or short lengths of
wire can work but probably will be very noisy.
All functions of the main program are controlled
using a two button joy stick connected to the right port. Position the
cursor for the desired action and push button 1 to activate. Disk I/O requires
multiple selection for activation.
RECEPTION
1) Select USB (default) or LSB to set program parameters.
2) CLEAR the screen if desired; advisable.
3) Select 60, 90, or 120 LPM.
4) Set the joystick to the bottom central position. Off center images can be shifted by left or right movements of the joystick.
5) To halt reception, center joystick; joystick full down to restart.
6) To restart image capture at any time, push joystick to full up center position; hold several seconds; push joystick full down and in center. Old image will be over written.
7) To end reception, push button #1. Reception will automatically stop when the picture buffer is full. Sound will be on with slight distortion during image capture
PHASING
Properly centered images will require receiving the
beginning of the transmission. Adjust the short bar to the full left on
the screen. With very clean signals, push button 2 which will bring the
bar into view. Final adjustments are made with left/right action of the
joystick.
1) Joystick full up position; centered.
2) With clean signals hold button #2 several (5) seconds.
3) Joystick left to move bar to edge of screen.
4) Center joystick and move to full down position.
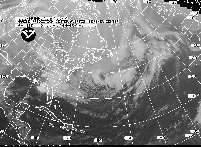
The image will be viewed by pushing J.S. button #1
from the command level while the cursor is not positioned for action or
immediately after reception. The full image is equivalent to 60(6x10)PMODE4
screens.
Movement of the joystick will cause the screen to
pan over the full image. The default mode is a wide (640/225) screen for
maximum image display. A press of J.S. button #2 will toggle between this
screen and a smaller screen (256/225) for more accurate images of 1/1 aspect
ratio which don't compress the image on the horizontal axis.
Press J.S. button #1 to return to the command screen.
The image may be viewed as often as desired until a new image is received.
The image can be reversed in color from the command
screen as often as desired.
DISK INPUT/OUTPUT
One full image buffer (16 minutes of data)requires
a full 40 track double sided disk. If your drive is not double sided, you
can't save more than the first half of the image.
The loader program will adjust your Coco to enable
40 track DSKINI operations. For fastest and smoothest disk I/O, use a step
rate of 2; ie. DSKINI1,2 and DSKINI2,2
Be sure to format enough disks for a session. It
is not possible to format disks from within the main program.If necessary
it is possible to leave the program (use the RESET button), format
some disks and restart FAX. Most of the image will remain in memory, but
the last few minutes will be lost.
SAVE & LOAD
1) Select the desired function from the command level with
joystick.
!!!!BE SURE TO USE A DATA DISK AND NOT THE PROGRAM
DISK!!!!
VIEW DISK
It is possible to view any picture disk without losing
much of the current image or loading the entire disk. Some current image
loss may occur from the end of large (15 minute) images.
1) Select VIEW mode.
2) Select the row to view; 1 - C
3) Pan over image slice with joystick; limited to horizontal.
4) Press button #1 to leave function.
PRINTING
CC3FAX allows dot matrix printing of the received
images. Use the CONFIG program on this disk to select an appropriate print
driver. This only needs to be done once as CC3FAX will be altered.
Select the section of image to be printed from the
command
level. Final image with strips taped together has 1536H resolution.
If you write your own assembly routine, it should
load at $1800. REQUESTS FOR CUSTOM DRIVERS must be accompanied by a
COMPLETE LIST of control codes and graphic printhead footprint data.
IMAGE PROCESSING
It is inevitable that there will be some noise in
the received image. CC3FAX provides two levels (low/high) of noise
removal using IMAGE. The low level removal should be used with pictures
that contain fine detail and little noise. Minimal loss of fine detail
will occure.
For images containing large amounts of noise and
little fine detail, high level filtering will remove almost all noise.
The filtering process may be repeated any number
of times for additional cleanup. Time required for one pass over
a 15 minute long picture is 5 minutes.
Please make a disk save of your picture before experimenting
with IMAGE as the process is a destructive one.
IMAGE
Suggested frequencies:1) Click on IMAGE
2) Then click on L for low level or H for high level filtering.
3) Terminate filtering at any time with button #1.
USN Norfolk, VA 335
8080 KHz
10865
16410
20015
USCG San Francisco, CA 4346
8682 KHz
12730
17151
22527
CF Halifax, NS Canada 4271
6330 KHz
10536
13510
SPECIFICATIONS
512K Coco 3, 40 track DDDS drive 0, shortwave receiver with SSB/CW required.
1) Reception rates: 60, 90, 120 LPM
2) Pixels per line: 1536. That is equivalent to an IOC of 576. Image
is monochrome.
3) Storage capacity: 1920 lines or 16 minutes at 120LPM
4) Memory capacity: one full image per 491K. 512K RAM required. Total
image size 1536x1920 pixels.
5) DISK storage: 1 image per 40 track DDDS disk
6) Printer resolution (ex. Tandy DMP200) 1536 dots/line in three passes
of 512 dots/line; tape strips side by side. Vertical capacity with fan
fold paper: length of image.
For further reading on FAX transmissions, refer to the following articles and your local shortwave radio distributor.
"Weather...or not", by Marty Goodman, Rainbow, Feb. 1985. The author of the current program gratefully acknowledges the debt to Graphicom and their code. It helps to stand on the shoulders of giants.
"Build the RADFAX Decoder" by John Clarke, Popular Electronics, Nov.1990. An alternative approach and additional information.
"Guide to Facsimile Stations 10th ed." by Klingenfuss available from most sources of shortwave radios; not Tandy. Details on FAX equipment, regulations, specification, frequencies and schedules.
Comments or help requests should be sent with a self addressed and stamped envelope to:
Robert Gault
832 N.Renaud
Grosse Pointe Woods, MI 48236
(313)-881-0335
IN CASE OF TROUBLE
Every effort has been made to see that this program
is trouble free, but it is impossible to plan for every eventuality.
If you should encounter trouble, make sure that you are following
the directions. Check the printer baud rate settings and drive side select
code in CC3FAX. You can edit the values using CC3FAX. Remember to always
make a backup and the put the original program disk away in a safe place.
Do not use the original disk as a working disk!
Try to keep the shortwave radio as far from the
computer system as possible. Don't expect reception conditions to
be uniformly good. Reception of Naval FAX is beamed to the Atlantic and
Pacific fleets and not to the Midwest (where we don't have navies.)
NFAX Norfolk broadcasts their schedule at 00:00 GMT.
USGC San Francisco " " " " 20:19 "
CF Halifax " " " " 10:14 "
For other problems, refer to the address previously given.